Git Version Control System in 15 minutes.

In this article I am going to talk about Git which is a version control tool. Now what has happened is we have made git complicated by clearly not understanding the fundamentals of this tool. All we do is git pull and git push. Sometimes it works and most of the time we run into merge conflicts and get stuck. Atleast this was the case for me. So I finally decided to have a clear understanding of this amazing tool and that clarified everything. So lets start…
Now there is a difference between Git and Github. Git is a version control tool while Github is a service that hosts Git projects so that the developers can easily collaborate while working on a project.
The version control systems are divided into two main categories. One is the centralized model and the other one is the distributed model.
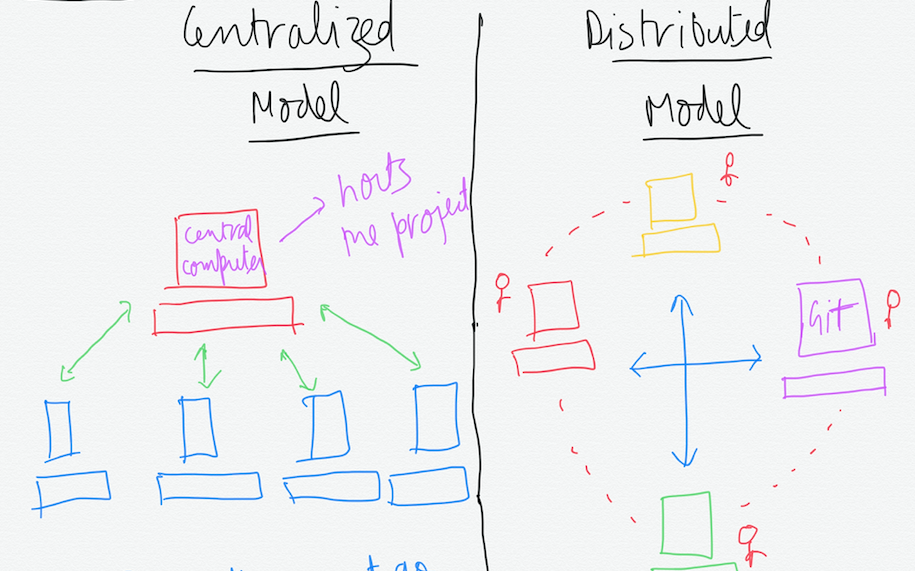
In the centralized model there is this central powerful computer that hosts the project and every interaction must go through it. The boxes looking somewhat like computers are the developers working on the same project. While in the distributed model, there is no central computer and every developer has the complete copy of the project. Now in this case they can work offline too on a particular feature of the project.
Git is a distributed version control system and the important thing to note here is that every developer has a complete copy of the project.
Here are some key terms used in the Git lingo. So keep referring back to these while we cover each one of them. You can just skim through them now.
Version Control System(VCS) or Source Code Manager(SCM): A VCS allows you to: revert files back to a previous state, revert the entire project to a previous state, review changes made over time, see who last modified something that might be causing a problem, who introduced an issue and when, and more.
Commit(Snapshot): Git thinks of its data like a set of snapshots of a mini file system. Every time you commit , or save the state of your project in Git, it basically takes a picture of what all your files look like at that moment and stores a reference to that snapshot.
Repository(Repo): A directory that contains your project work, as well a few files(hidden by default on Mac OS X) which are used to communicate with Git. Repositories can exist either locally on your computer or a separate remote copy on another computer.
Working Directory: The files that you see in your computer’s file system. When you open your project files up on a code editor, you’re working with files in the Working Directory.
This is in contrast to the files that have been saved(in commits!) in the repository.
When working with Git, the Working Directory is also different from the command line’s concept of the current working directory which is the directory that your shell is “looking at” right now.
Checkout: When content in the repository has been copied to the Working Directory. It is possible to checkout many things from a repository; a file, a commit, a branch, etc.
Staging Area or Staging Index or Index: A file in the Git directory that stores information about what will go into your next commit. You can think of a staging area as a prep table where Git will take the next commit. Files on the staging Index are poised to be added to the repository.
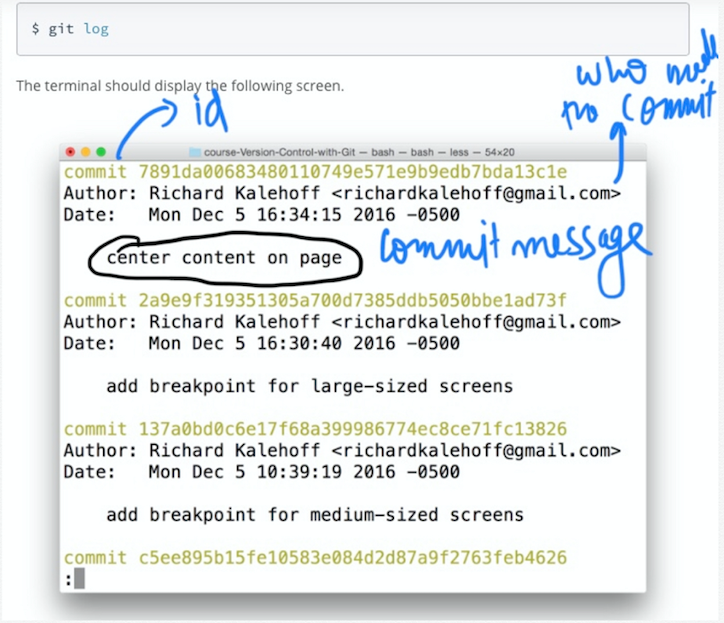
SHA: A SHA is basically an ID number for each commit. It is a 40-character string composed of characters(0–9 and a-f) and calculated based on the contents of a file or directory structure in Git. “SHA” is a shorthand for “SHA hash”. A SHA might look like this:
e2ad8ae3e2e4ed40add75cc44cf9d0a869afeb6
Branch: A branch is when a new line of development is created that diverges from the main line of development. This alternative line of development can continue without altering the main line.
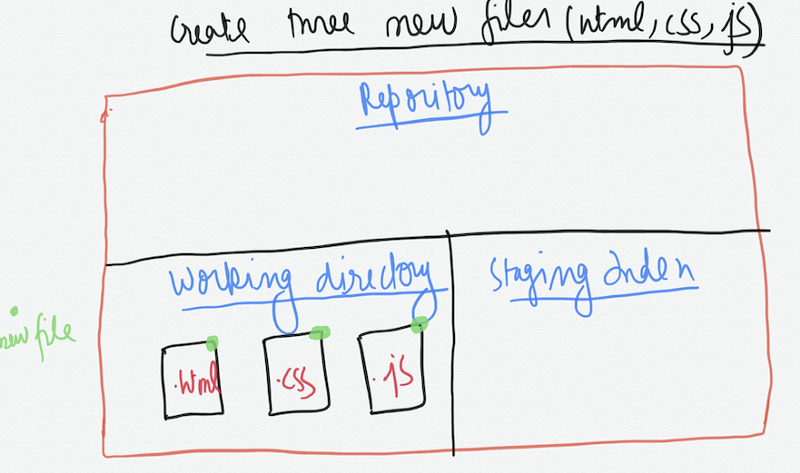
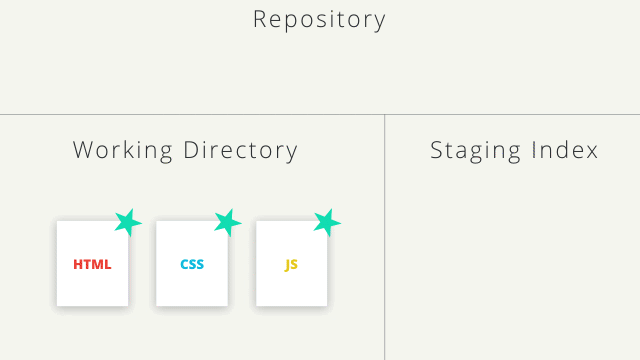
Git Repository
Git repository can be viewed as having three main area- The working directory, The Staging Index and the repository where all the commits are saved.
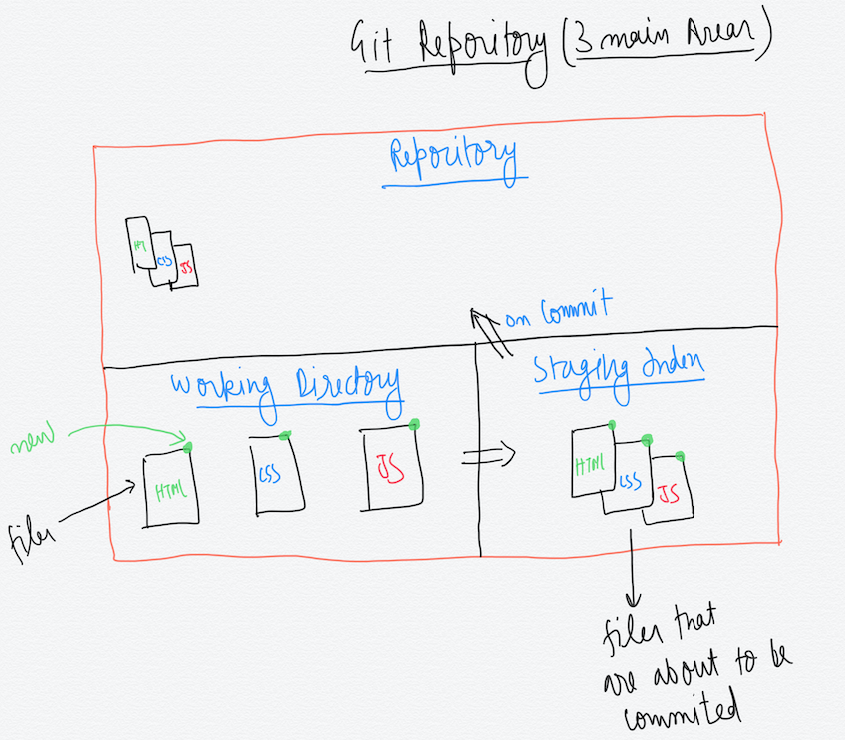
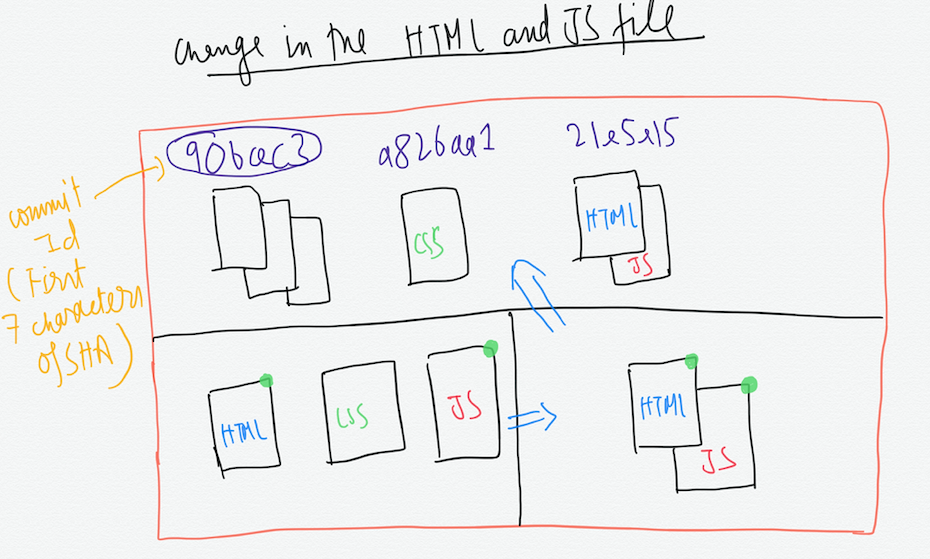
Now suppose we have three new files that we have created in our working directory. HTML,CSS and JS file. To save the current states of these files we have to first add them to the staging index. From the staging index we add them to the repository which saves the current state of the files. We will see the commands to do that shortly.
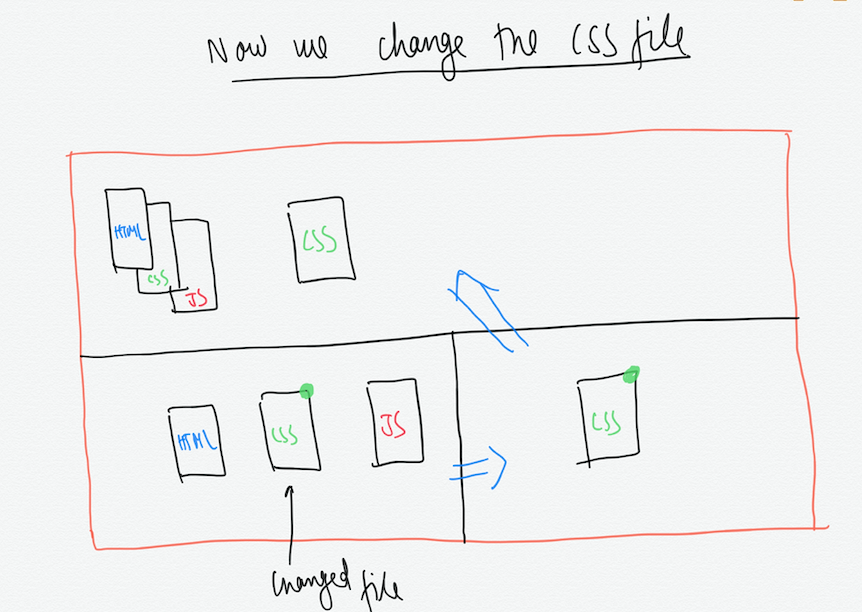
Now we again change the CSS file, stage it and commit it to the repo.
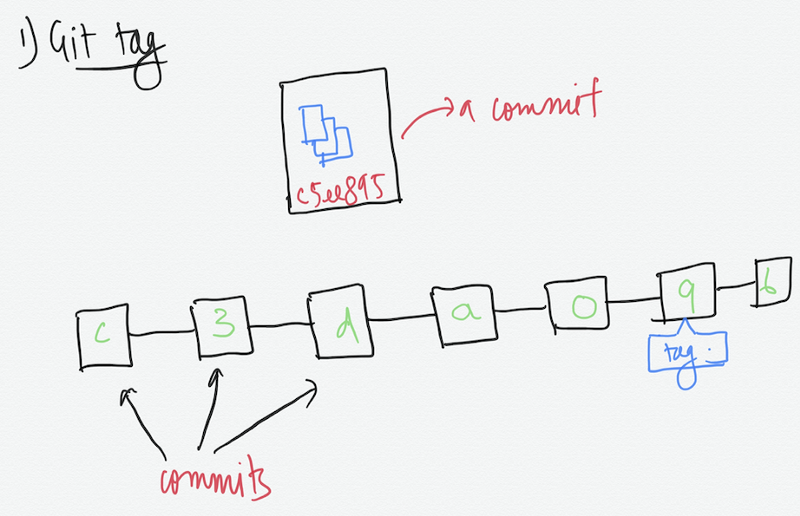
We can see that these changes are being recorded in the repository. So for each commit, git takes the snapshot of the changed files and stores it in the repo. It provides a 7-digit commit Id for each commit which are the first seven characters of the 40-digit SHA. The commit id is used to identify a particular commit.
Creating a Git Repository
There are three commands that we are going to cover in this section. Git init, Git clone and Git status.
git init
In the shell, while in the working directory you want to track with git, this command does the following things:-
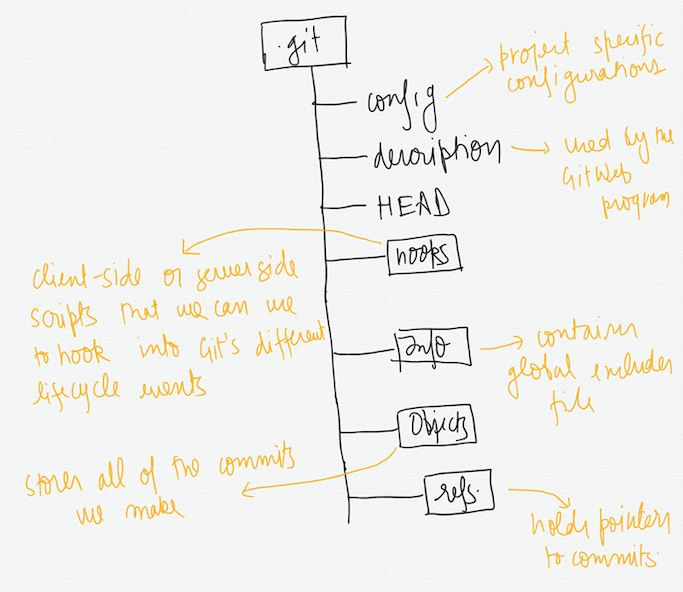
- It sets up all the necessary files and directories that Git will use to keep track of everything.
- All these files are stored in a directory called
.git - The
.gitdirectory is the “repo” that we have been talking about. This is where git records all of the commits and keeps track of everything.
The structure of this directory is shown in the image below.
git clone <URL>
When you need to work on some project that is not there in your computer or you want to contribute to an open source project, you have to clone it from the web. Now when that project is hosted on Github, Gitlab or Bitbucket we can easily get the URL of that project. Then you run the above command and you get a complete copy of that repository on your computer.
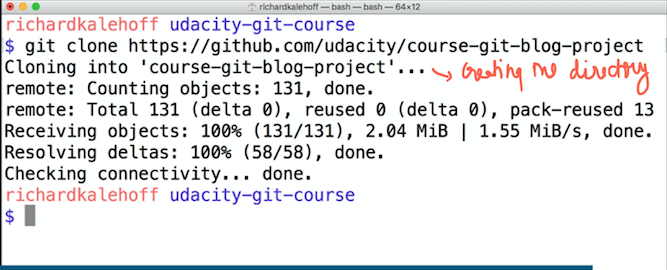
By default the name of the folder is the one you cloned from. If you want to change the name of the folder that Git creates, you can run the command
git clone <URL> <new-name>
Now the git repo has already been initialized by this command in the project directory. We don't need to run git init again.
git status
This command is used to check the state of the repository we are in. Lets see the output of running this command on the project we cloned earlier. Remember, you will have to cd into that directory first.
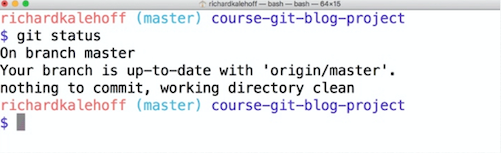
I will explain each line in the output.
a) On branch master — This tells us that we are on the master branch (which is the default branch). I will talk about branches a little later in this article.
b) Your branch is up-to-date with ‘origin/master’ — Because git clone was used to copy this repository from another computer, this is telling us that it is up-to-date with the one we cloned from.
c) Nothing to commit, working directory clean — This is telling us that there are no pending changes that need to be committed to the local repo.
Review a Repo’s History.
There are two commands we are going to see in this section — Git log and Git show.
git log
It displays info about the existing commits that have been made in the repo. It shows the commit 40-digit SHA, the author who made that commit, date and time of the commit. It also shows the commit message. So it is a good practice to give meaningful commit messages.
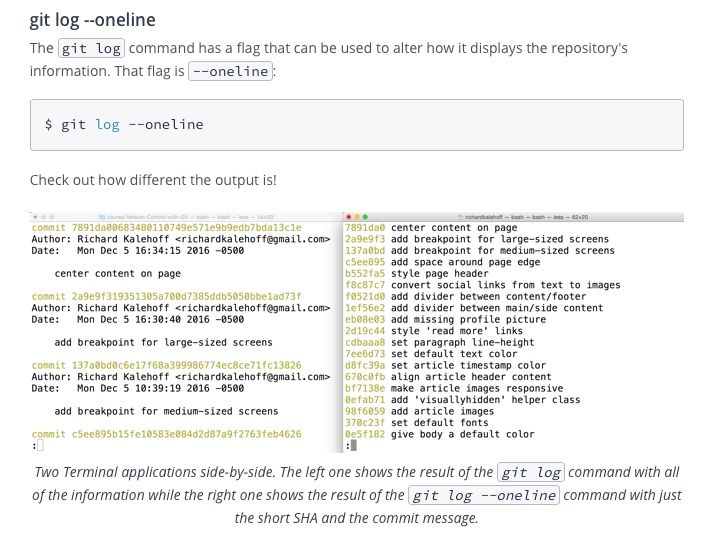
You can also get the commit id and message in a single line by writing the command —
git log --oneline
We can see which files were changed using the stat flag with git log.
git log --stat
The plus(+) sign tells us about the number of lines inserted in the file while minus(-) sign tells us about the deletions in the file.
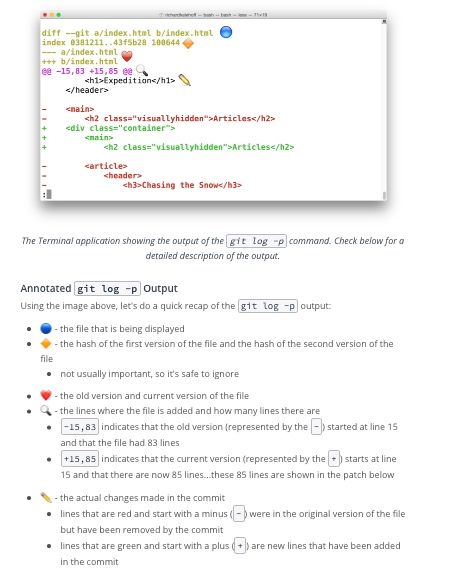
What exactly those changes were ? Use the ‘p’ flag
git log -p
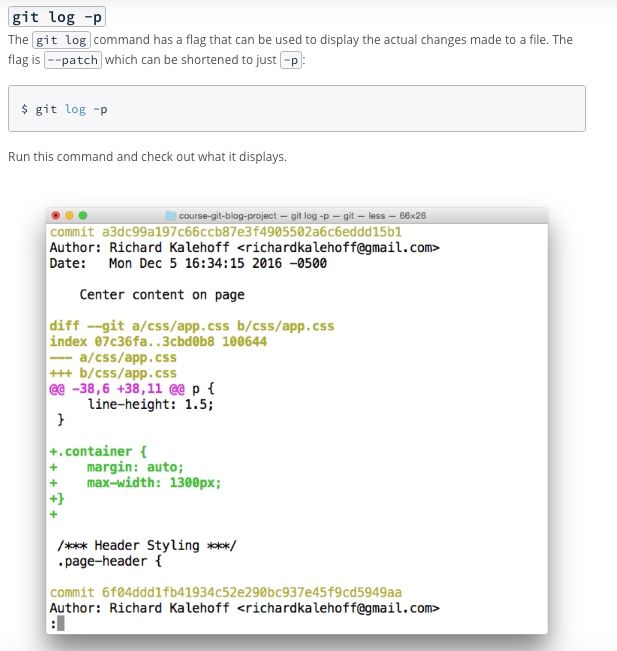
Here is an explanation of what these above lines mean. (Courtesy — Udacity Git Course)
Adding commits to a repository
Here we are going to see three commands which are git add, git commit and git diff.
git add
This command adds files from the working directory to the staging index. We have created three new files and want to track them using version control.
We have some new files that we want to start tracking. For Git to track a file, it needs to be committed to a repository. For a file to be committed, it needs to be in the staging index. The git add command is used to do so.
In the working directory type the command..
git add .
The dot (.) after the add command, adds every changed file to the staging index. If you want to add a file particularly to the staging index, git add <file-name>
git commit -m “Initial commit”
This command is used to add the files from the staging index to the repository itself. Note that only the files that were staged during git add will be committed to the repository.
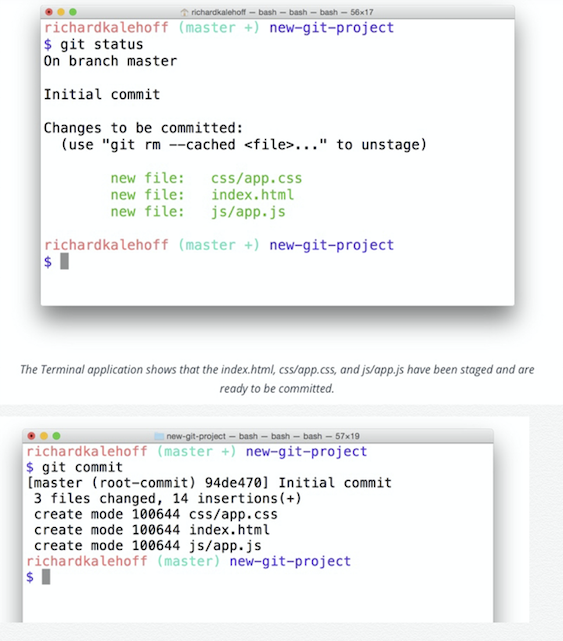
In the above image we can see that this commit has been given a commit Id of 7 digits.
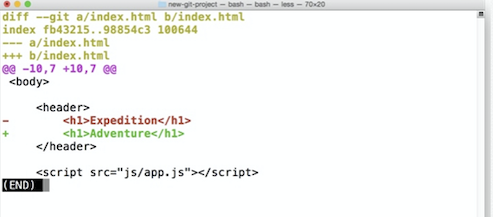
git diff
This command can be used to see the changes that have been made but haven’t been committed yet.
There is also a .gitignore file in which you can write the names of files you don't want to track with git.
Tagging, Branching and Merging.
In this section I am going to show you how to create branches and how to merge branches together. There are 4 simple commands in this section that are git tag, git branch, git checkout and git merge.
Tagging
This command lets us add tags to specific commits.
git tag -a v1.0
This command above will let you add tag to the present commit you are on. Suppose after this commit, you are going to start development of the version 2.0 of your app and you want to add a marker or tag here to let you remember it.
To add a tag to a past commit,
git tag -a v1.0 a87984b
Deleting a tag,
git tag -d v1.0
Branching
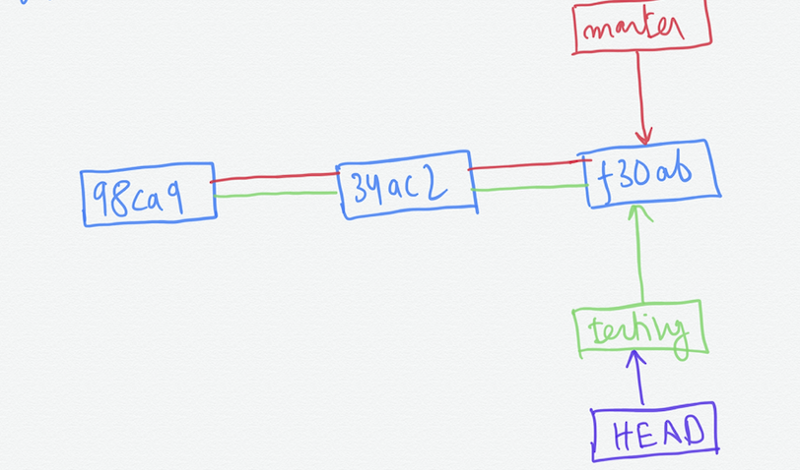
In case you noticed, we have been working on master branch so far. So what is a branch ? How do you create one and how to switch between branches ?
By default when we initialize the git repo, it creates a master branch for us which is the default branch name. Now you can view a branch as a series of commits happening.
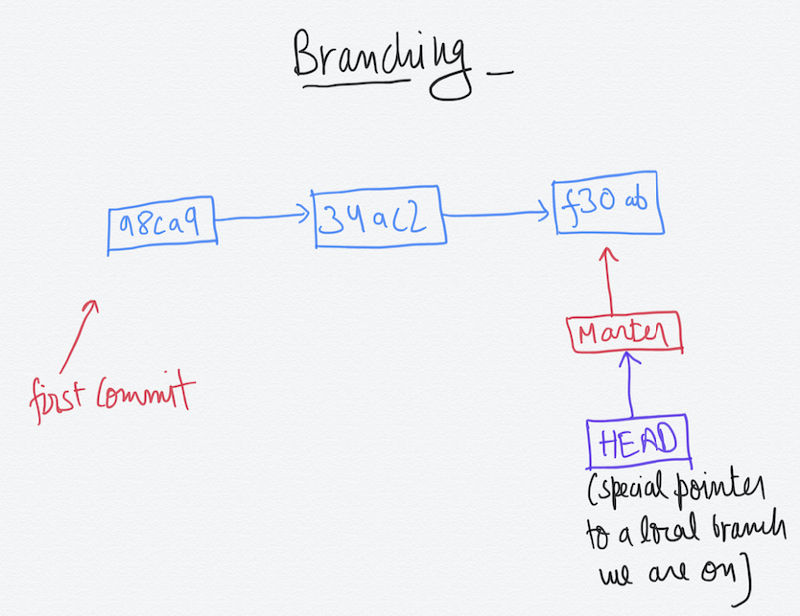
In the image above, we have three commits. You can see the master branch pointer on the latest commit made. We also have a special HEAD pointer which points to the branch we are currently working on. It is pointing to the master branch pointer currently. There can be n number of branches in a repository.
To create a branch named testing, we can run the command —
git branch testing
This creates a new pointer at the same commit we are currently on as shown in the image below —
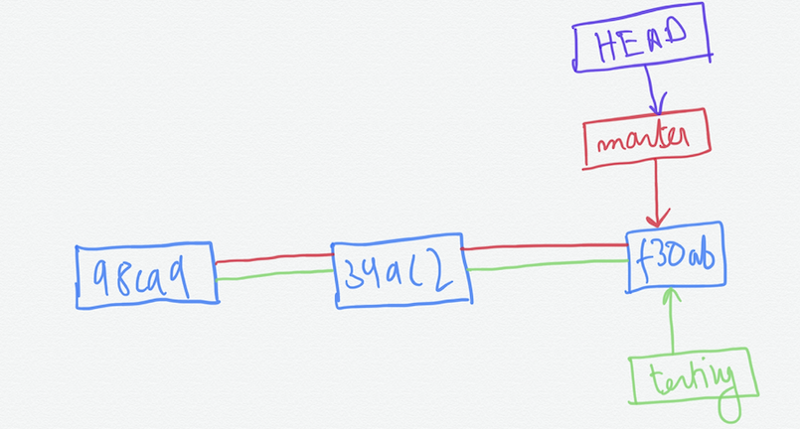
To see where the branch pointers are pointing run the command.
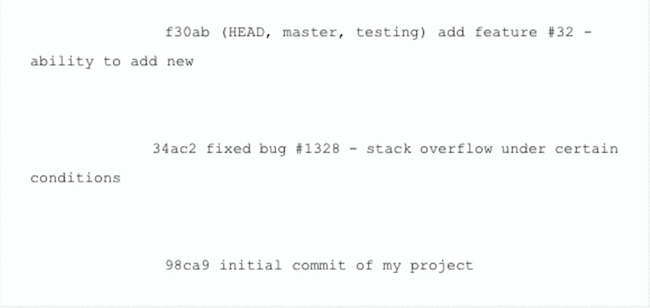
git log --oneline --decorate
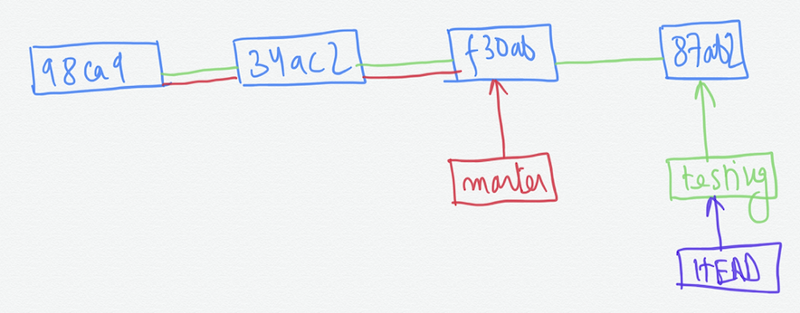
To switch to the testing branch,
git checkout testing
This moves head to point to the testing branch.
Now if we commit at this point, it will only move the testing pointer and master will remain at its place.
If we switch to master again by typing the command —
git checkout master
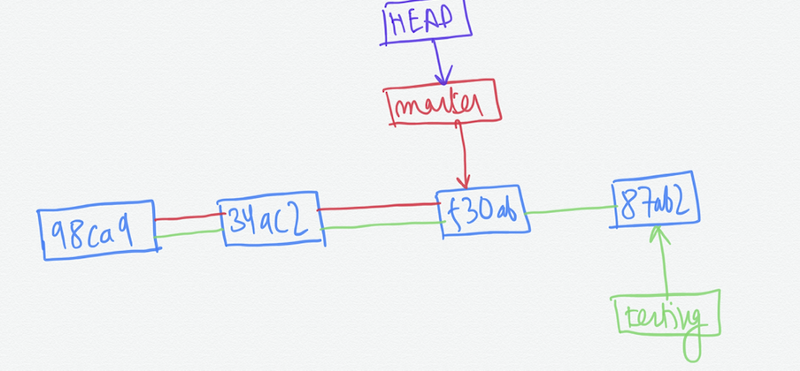
HEAD has moved to master now and we are on the master branch. It will do two things -
- It moved the head pointer back to point to the master branch.
- It reverted the files in the working directory to the snapshot that master points to. That is the changes made in the commits on the testing branch will not be visible in the editor.
Lets make one more commit on the master branch.
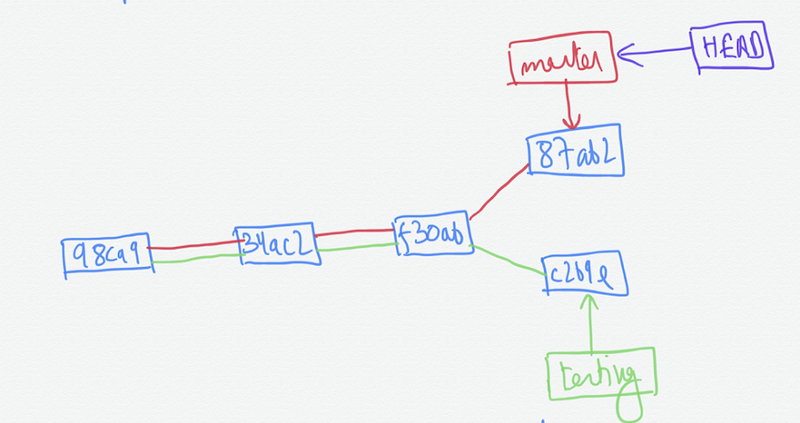
This takes us to the concept of merging.
Also to start a branch from a specific commit, we can run the command —
git branch <name-of-branch> <commit-Id>
Merging
Combining branches together is called merging. Reasons to merge are —
- Either the work on your feature branch is over. Or,
- You completely want to ignore those changes, in this case you delete the branch.
Merging is of two types, Regular Merge and Fast-Forward Merge.
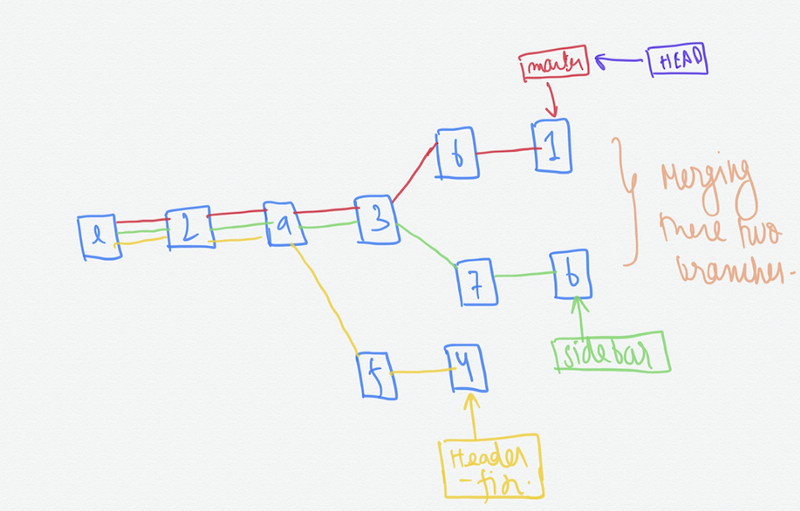
If we are on the master branch, we can merge with the sidebar as
git merge sidebar
This creates a new commit and the master pointer moves forward to that commit. Remember we can run into merge conflicts which I am going to talk about next.
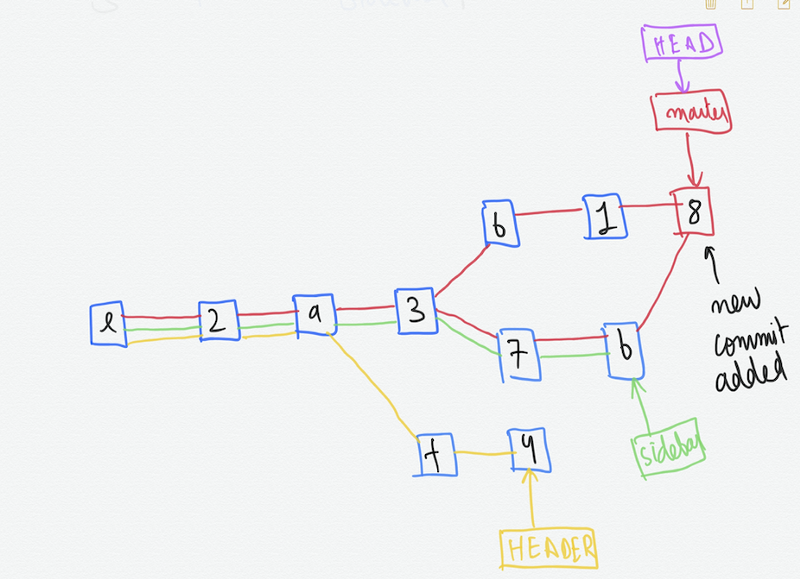
Deleting a branch after merging
git branch -d sidebar
Note:- You cannot be on a branch and delete/merge the same.
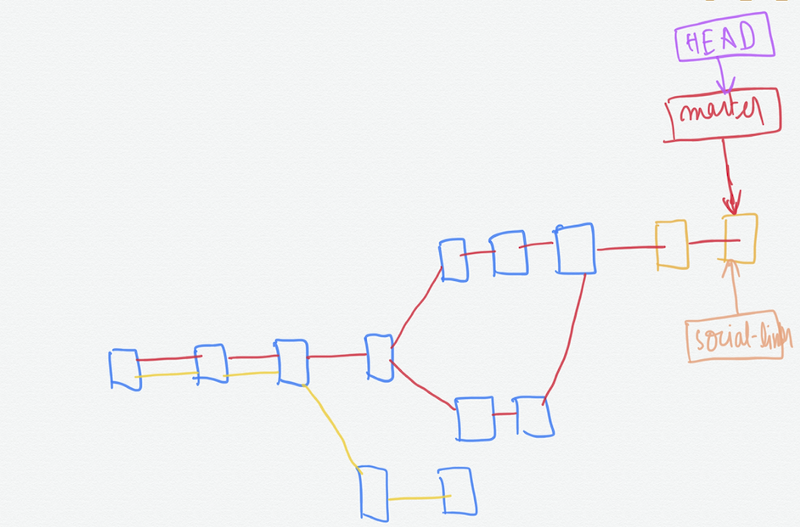
We have created one new branch social-links, made some commits on that and then switched on to master again.
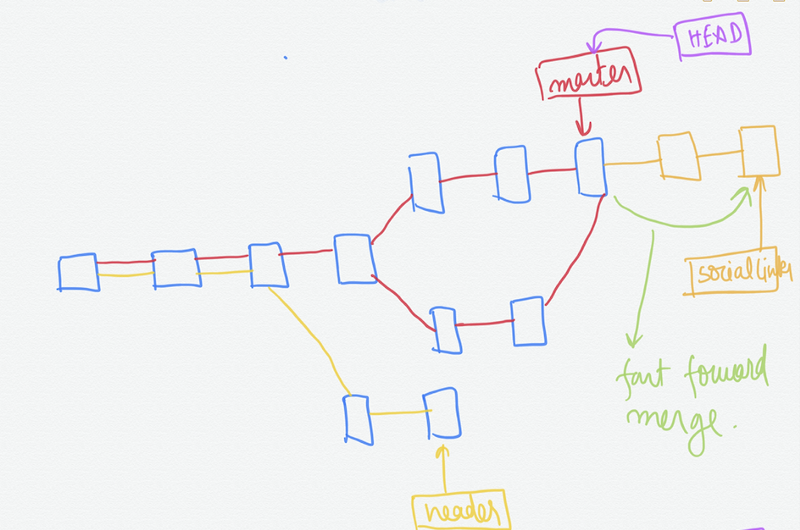
If we merge the social-links branch by running the command —
git merge social-links
It is called fast-forward merge since social-links is directly ahead of the master on the commits chain.
Merge Conflicts
Git tracks lines in files. A merge conflict occurs when the exact same lines are changed on different branches and we merge them. (Images taken from www.udacity.com)
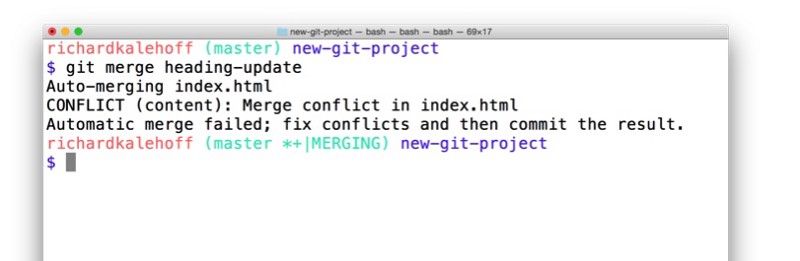
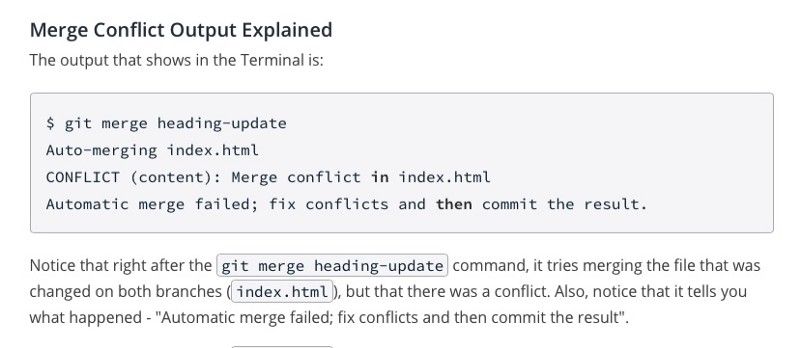
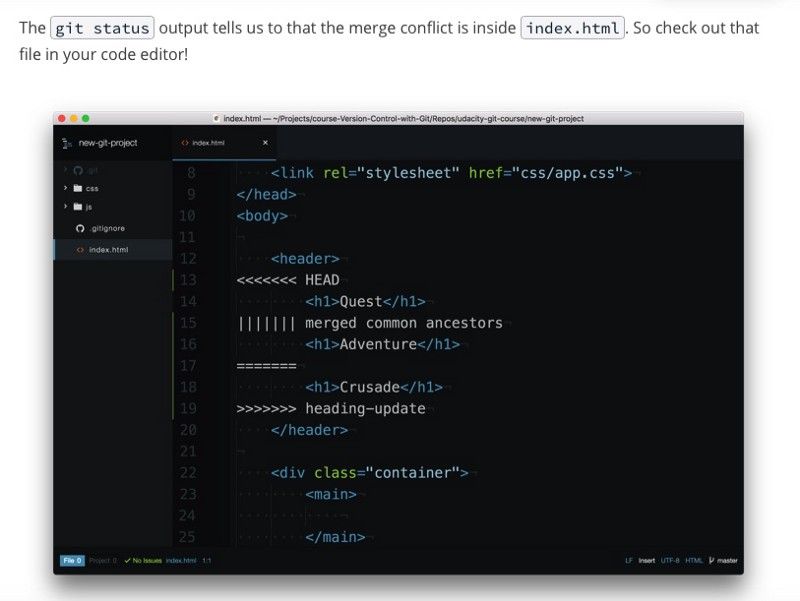
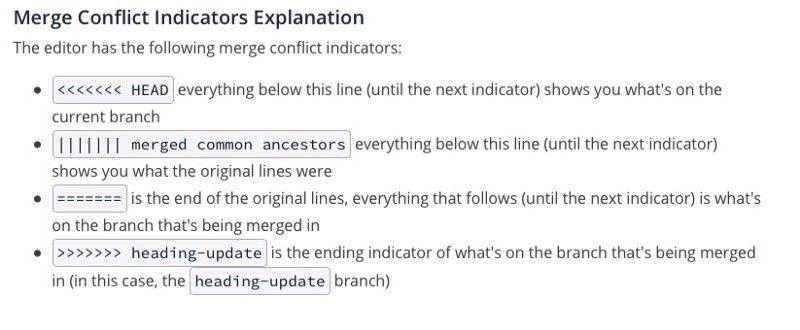
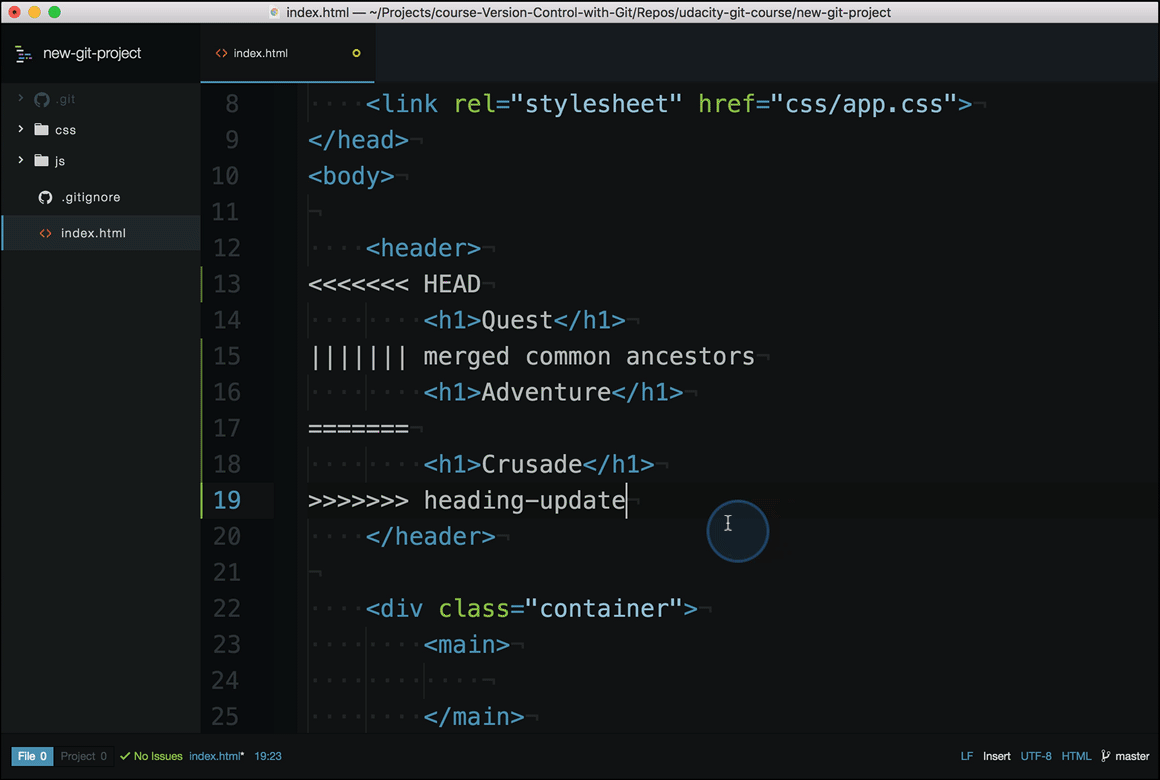
After removing the conflicts save, stage and commit.
Undoing Changes
In this section we are going to see three commands
git commit --amend
Amend is used to alter the most recent commit. You can use it in case you forgot to add a file in the last commit or there is a typo in the commit message. Reviewing History .
git revert
Git revert is used to reverse a commit using SHA. It doesn’t delete any commit but creates a new commit and undo’s the changes.
git reset
Git reset is actually dangerous. It removes commits from the repo and therefore the changes made in those commits.
Working with remotes (welcome to github!)
Up till now we were talking about the local repository in our computer. But in real scenario, many developers will work on the project at the same time but on different branches. These branches are specific to a particular feature. When these features are ready, they can be merged with the main branch and can be deleted. This allows developers to collaborate on a project, and work remotely or even offline.
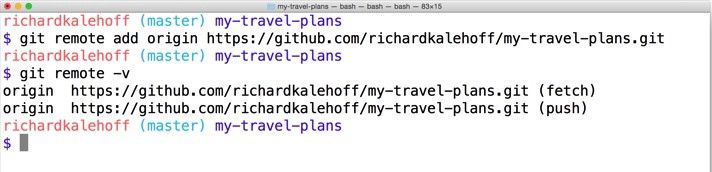
Add a remote repo
git remote add origin <URL>
Here we have given a name origin to the remote connection we have made to the repository. We can give it any name.
git remote add origin https://github.com/user/repo.git
We can check the remote connection by the command —
git remote -v
This remote repository will also be a chain of commits on different branches.
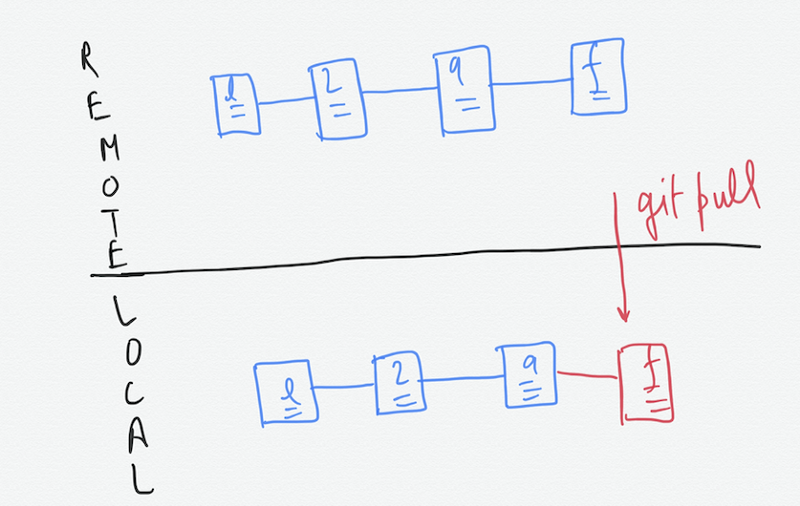
When we fetch the commits from the remote to our local repository, it is a Pull. By the way fetch is another git command which I will cover shortly.
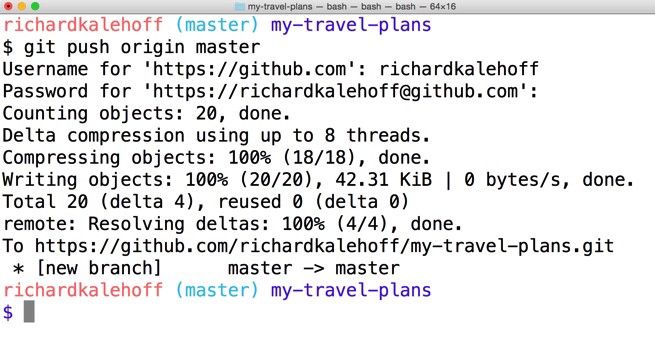
When we migrate the commits made in our local repository to the remote that we connected to, its called a Push
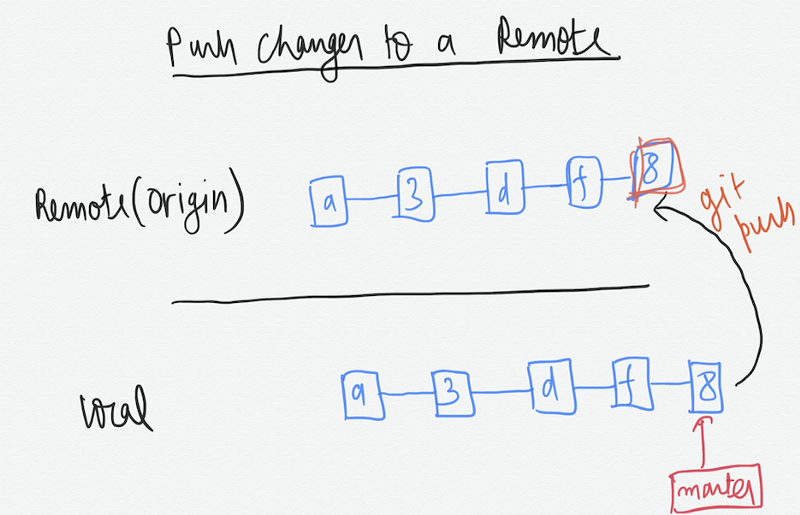
git push <remote-shortname> <remote-branch-name>
Example-
git push origin master
Lets look more closely on what git clone does because we will be needing it in the next section.
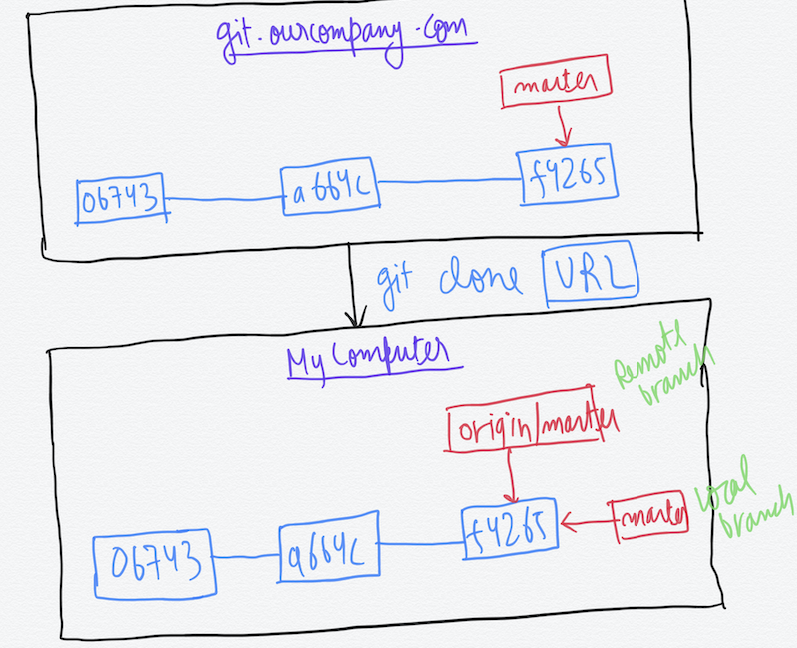
What git clone has done is it has pulled in all the commits from the repo to our local master branch that we were on when cloning. It has also created a remote tracking branch that is origin/master and it is pointing to the last commit on master branch which is on the remote. An important point to note is that even though its a remote tracking branch, its not a live representation of the remote master branch. It only gets updated on a push, pull and fetch. On making the commit now, only the master pointer will move. Also if some other collaborator makes a push on the remote, it will have no effect on our remote tracking branch, that is origin/master.
Pulling and Fetching (The difference!)
Here is a simple formula —
git pull = git fetch + git merge
git fetch origin master
This command is telling git to fetch all the changes that are there on the remote but do not change the working directory i.e. do not apply the commits.
Also the merge will be of only two types that we discussed — Regular and Fast-Forward merge.
Lets understand this with the help of a simple example as this is where most of the merge conflicts occur.
Case 1) You have pulled from the remote and changes are only there on the remote. That is someone else has pushed their commits on the remote while you haven’t made any commits locally.
When you run the command —
git pull origin master
It does a fast-forward merge in this case without giving any merge conflicts. It does the following:-
- Pulls the commits from the remote to the local.
- Merge origin/master with master branch locally.
Case 2) We pulled from the remote, made a commit locally, while someone else committed on the remote

When we do a git pull now it wont work because both the repos are out of sync.
git pull origin master # this wont work
We first have to do —
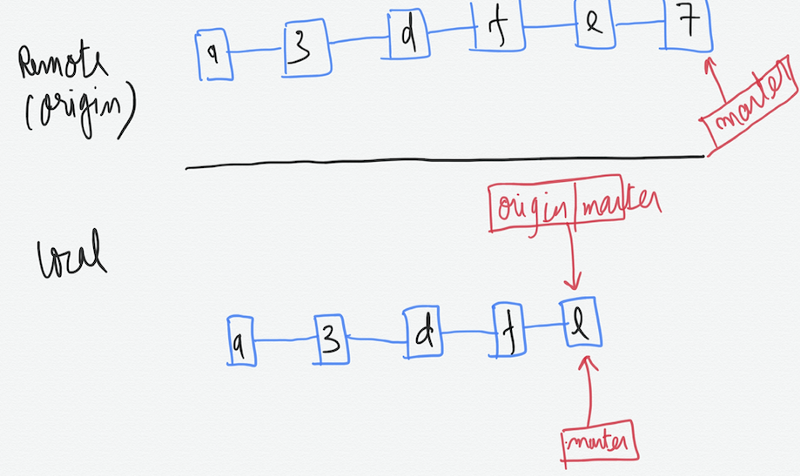
git fetch origin master
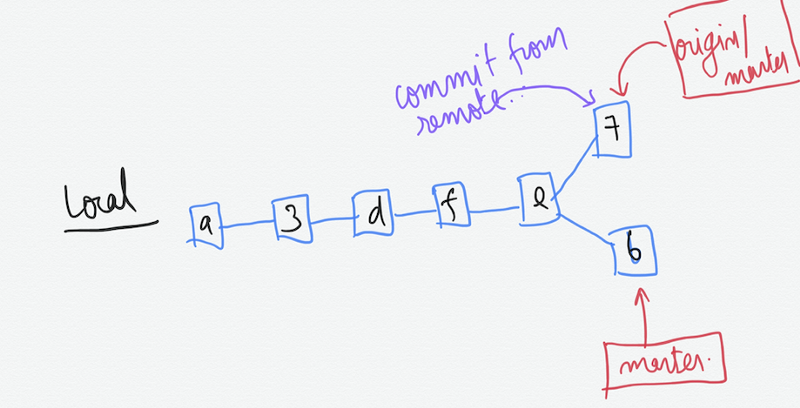
This fetches the remote commit from the repo but doesn’t merge it. It also adjusts the remote tracking branch to the latest commit on the remote.
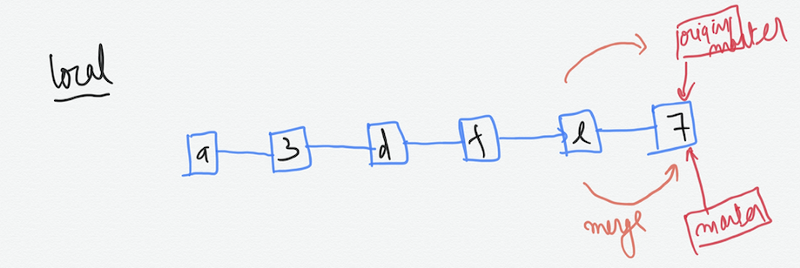
Now we can perform the merge by the command —
git merge origin/master
Which performs a regular merge in this case by creating the new commit. Note that here too we can get a conflict if we have changed the same lines in the same file in the commit ‘7’ and ‘b’.

Now we can simply push our changes to the remote assuming that no one has meanwhile pushed their commits on the remote.
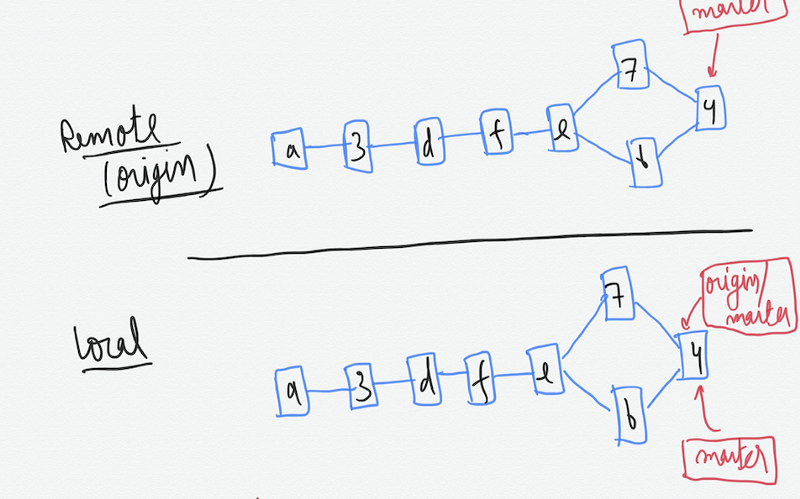
Now both the remote and local are in sync :-)
Thank you all for reading till the end. Forking, Rebasing, etc. are still left. We will see them next time. Hope this helps!