UM-Alchemy - Convert UML to Python models.

Introduction
This documentation is for the UM-Alchemy - UML diagram to SQLAlchemy model auto-code generation tool. Apart from generating SQLAlchemy models, this tool gives a little twist. We love sticking to streamlined Object Oriented Modelling. We make sure that we use the best architectural principles. We have strictly adhered to "segregation of responsibilities". So we regard model as a "Data Access Object(DAO)". In addition to model, we auto-generate code for business-logic layer. This document is intended for use by the project architects and developers who follow a methodical approach i.e. Object Oriented Modelling as the first step of their project. The development can be accelerated by using this tool.
System Overview
Our system takes as input the Star UML(.mdj) file and creates the SQLAlchemy Object Relational Mapping(ORM).
This system takes as input -
- UML Diagram file(.mdj)
As output, the system gives the following -
- SQLAlchemy ORM code(Models)
- Business logic layer as Python classes
Pre-Requisites
For generating the models
- Star UML(Version 3.0.2) for making UML diagram.
- Web Browser(Chrome,Safari,Firefox,IE).
- A stable Internet connection.
For migrating the models to the database
- Python Version 3.
- The generated models.
- Python third-party libraries
- json(Any Version)
- os(In-Built)
- flask-sqlalchemy==2.1
- psycopg2==2.7.5.
Steps
- Prepare the UML according to the conventions given in this document.
- Upload it to our website.
- Download the auto-generated code.
- There will be a manage.py file in the downloaded folder. Run it as in the example shown below.
Conventions while making UML Class Diagram
The conventions are that you need not write data type for the string data types in the UML. They are considered to be string by default. Also if there is a list of some other class it is written as Class name with the suffix Array. For example 'ParameterArray'. The data type of other classes are written as it is.
You do not need to define any special associations in the UML. Only the normal association is used. If there is an association, you need to define the attribute in the child class referring to the parent class. This will be the foreign key attribute.
After running the script the SQLAlchemy ORM is created. When you migrate it to the database that you created, the tables are created.
The methods that we need are Create, Read, Update and Delete. Rest of them are just the combinations of one or more of these methods. We do need to explicitly declare them in the UML. So the Auto-crud methods are written in Python models file by the tool.
An Example
I will show you how to use the tool with the help of a very simple example.
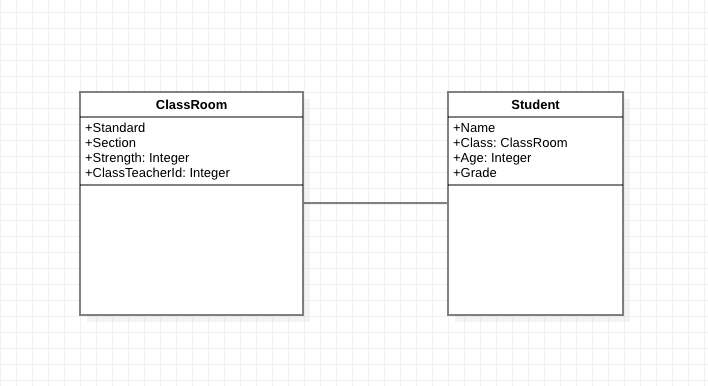
In this simple UML diagram ClassRoom and Student are classes. As a particular Student belongs to a class and class is a collection of Students, it is a container-contains relationship. After running the script by giving this 'example.mdj' file as a input, this is the folder structure that is generated.
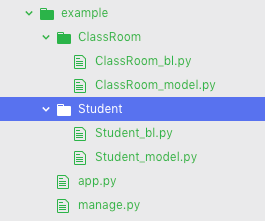
File with the suffix bl is the business logic layer. While the file with the suffix model is the SQLAlchemy model. Before migrating this to the tables, we first need to create a empty database example in the pgAdmin4 window. Lets look at the models that have been generated.
import os
import sys
from sqlalchemy.exc import SQLAlchemyError
sys.path.append(os.getcwd() + '/..')
from example.app import db
from example.ClassRoom.ClassRoom_model import *

class Student(db.Model):
	__table_args__ = {'extend_existing' : True}

	modified_date = db.Column(db.DateTime())
	last_modified_by = db.Column(db.Integer())
	active = db.Column(db.String())
	deleted = db.Column(db.String())
	id = db.Column(db.Integer(), primary_key = True)
	audittrail = db.Column(db.Integer())
	name = db.Column(db.String(255))
	class_id = db.Column(db.Integer(), db.ForeignKey('classroom.id'))
	age = db.Column(db.Integer())
	grade = db.Column(db.String(255))

	@staticmethod
	def create_Student(**kwargs):
		student_object = Student(**kwargs)
		db.session.add(student_object)

	@staticmethod
	def update_Student(dictionary,filter):
		try:
			row = Student.get_by(filter)[0]
			for key,value in dictionary.items():
				setattr(row, key, value)
			db.session.add(row)
		except:
			pass

	@staticmethod
	def get_by(**kwargs):
		return(Student.query.filter_by(**kwargs).all())

	@staticmethod
	def delete_Student(filter):
		temp = dict()
		temp['deleted'] = 'True'
		Student.update_Student(temp,filter)

	@staticmethod
	def commit():
		try:
			db.session.commit()
		except SQLAlchemyError as e:
			error_message = e.orig.args
			for item in e.orig.args:
				print(item)
			return error_message
Here we can see that the Student class is extending from the SQLAlchemy 'db.model' class. Also since we defined the foreign key class_id as referring to the ClassRoom id, we can see the releationship is handelled by the following attribute.
class_id = db.Column(db.Integer(), db.ForeignKey('classroom.id'))
Also there are Create, Update, Get and Delete methods that are static and can be used to interact with the data in the database tables.
Migrating to the database
Now we need to run the manage.py script to actually migrate the ORM to the database tables.
app.config['SQLALCHEMY_DATABASE_URI'] = 'postgresql+psycopg2://postgres:root@localhost:5432/example'
This is the line in app.py which is used to configure the database settings. Here postgres is the database name, root is the password and the pgAdmin server is running on localhost port 5432. The database is 'example' that we just created.
python3 manage.py
You can try this tool at www.simpragma.com accelerator section. Thanks for trying it out. Please also feel free to give feedback and suggestions here.