Continuous QA for IOS apps with SonarQube - small steps, huge gains


In the era of automation, having another person to spend time to review my code sounds like spoiling my habits.
I was yet into another project, and needless to mention it was very innovate initiative, very challenging, tight deadlines and watched closely by top management in multinational corporate. My technical architect now came up to me and made his expectation very clear on high quality under the given constraints. I was sure that now i cannot depend on anyone to review my code. This prompted me to summon all the tools on the internet to automate quality assurance while i was developing.
Technology selection
Continuous QA, automation and the tools to do them are not new. Especially when i attended interviews a while back, these questions were part of every interview. So i had pretty good familiarity and hands on practice on this. However in this project, i was going to use the tool for iOS and on my Mac, to be integrated with other tools in the pipeline. Enough of a challenge? So i get into action and grabbed on from the internet. Got a plugin and shot it to my architect. Since it was paid, it as rejected. Now the level of challenge matched my tenacity :) So as usual i rise up the situation and fish for a free tool.
What prompted me to write this blog
There was free tool available, but not with bugs. It is easy guess that it was open source, so not regulary supported. Luckily it was in Java. So i was able to troubleshoot the problem and fix the defect. However, the original developer has now fixed the problem. Even in this situation, if someone wants to setup continuous QA for this kind of envrioment they lose a week. Now my colleagues are able to do it in couple of hours leverging my lessons learnt.
Shortlisted technology stack
I ended up using SonarQube. The most pressing criteria, ofcourse was the fact that it was free. And it perfectly aligned with other DevOps tools in the project like Gitlabs, Jenkins, Docker and Jira. It matched my core requirements. It had support to review code in 25 languages. All the best practices and standards were configured. The preconfigured rules were adequate for my project. So here is how you go about
Pre-requisites

- a Mac with Xcode 7+
- SonarQube and SonarQube Scanner
- xcpretty (gem install xcpretty)
- SwiftLint (HomeBrew installed and brew install swiftlint). Version 0.3.0 or above.
- Tailor (HomeBrew installed and brew install tailor). Version 0.11.1 or above.
- slather (gem install slather). Version 2.1.0 or above (2.4 since Xcode 8.3).
- lizard (PIP installed and sudo pip install lizard)
- OCLint installed. Version 0.11.0 recommended (0.13.0 since Xcode 9).
- Faux Pas command line tools installed (optional)
SonarQube
Download the SonarQube Community Edition. Unzip it, let's say in C:\sonarqube or /opt/sonarqube. Start the SonarQube Server:
On Windows, execute:
C:\sonarqube\bin\windows-x86-xx\StartSonar.bat
On other operating systems, execute:
/opt/sonarqube/bin/[OS]/sonar.sh console
Log in to http://localhost:9000 with System Administrator credentials (admin/admin) and analyze your first project.In terminal run below command to install Homebrew (ignore if it is already installed)
/usr/bin/ruby -e "$(curl -fsSL https://raw.githubusercontent.com/Homebrew/install/master/install)"
update Homebrew using below command
brew update
Install Sonar Scanner using below command
brew install sonar-scanner
when it’s installed you may have to add the path in .bash_profile as follows (depending where it’s installed):
export PATH=/Users/Shared/sonar-scanner-3.0.3.778/bin:$PATH
execute .bash_profile using following
. ~/.bash_profile or source ~/.bash_profile
Install Xctool
brew install xctool
Install OCLint
 brew tap oclint/formulae
 brew install oclint
Installation (once for projects)
- Download the plugin binary into the $SONARQUBE_HOME/extensions/plugins directory
- Copy run-sonar-swift.sh somewhere in your PATH(For Swift) Copy run-sonar.sh somewhere in your PATH(For Objective-c)
- Restart the SonarQube server.
- Copy sonar-project.properties in your Xcode project root folder (along your .xcodeproj file)
- Edit the sonar-project.properties file to match your Xcode project>
sonar-project.properties
##########################
\# Required configuration #
##########################

sonar.host.url=http://localhost:9000/
sonar.projectKey=projectKey
sonar.projectName=projectName
sonar.projectVersion=1.0.0
sonar.language=objectivec

\# Project description
sonar.projectDescription=projectDescription

\# Path to source directories
sonar.sources= sources/
\# Path to test directories (comment if no test)
sonar.tests=./testsTests

sonar.exclusions=./testsTests//*

\# Coverage type to expect from project
\# can be 'legacy' (pre Xcode 7) or 'profdata'
\# If not set : defaults to profdata
\#sonar.objectivec.coverageType=profdata

\# Destination Simulator to run surefire
\# As string expected in destination argument of xcodebuild command
\# Example = sonar.swift.simulator=platform=iOS Simulator,name=iPhone 6,OS=9.2
sonar.objectivec.simulator=platform=iOS Simulator,name=iPhone 8,OS=latest


\# Xcode project configuration (.xcodeproj or .xcworkspace)
\# -> If you have a project: configure only sonar.objectivec.project
\# -> If you have a workspace: configure sonar.objectivec.workspace and sonar.objectivec.project
\# and use the later to specify which project(s) to include in the analysis (comma separated list)
sonar.objectivec.project=project.xcodeproj
sonar.objectivec.workspace=project.xcworkspace

\# Scheme to build your application
sonar.objectivec.appScheme=appScheme
\# Scheme to build and run your surefire (comment following line of you don't have any surefire)
sonar.objectivec.testScheme=testScheme
In Terminal go to project's root directory and run below command to scan project for errors and bugs.
. run-sonar-swift.sh (For swift)
. run-sonar.sh (For Objective-c)
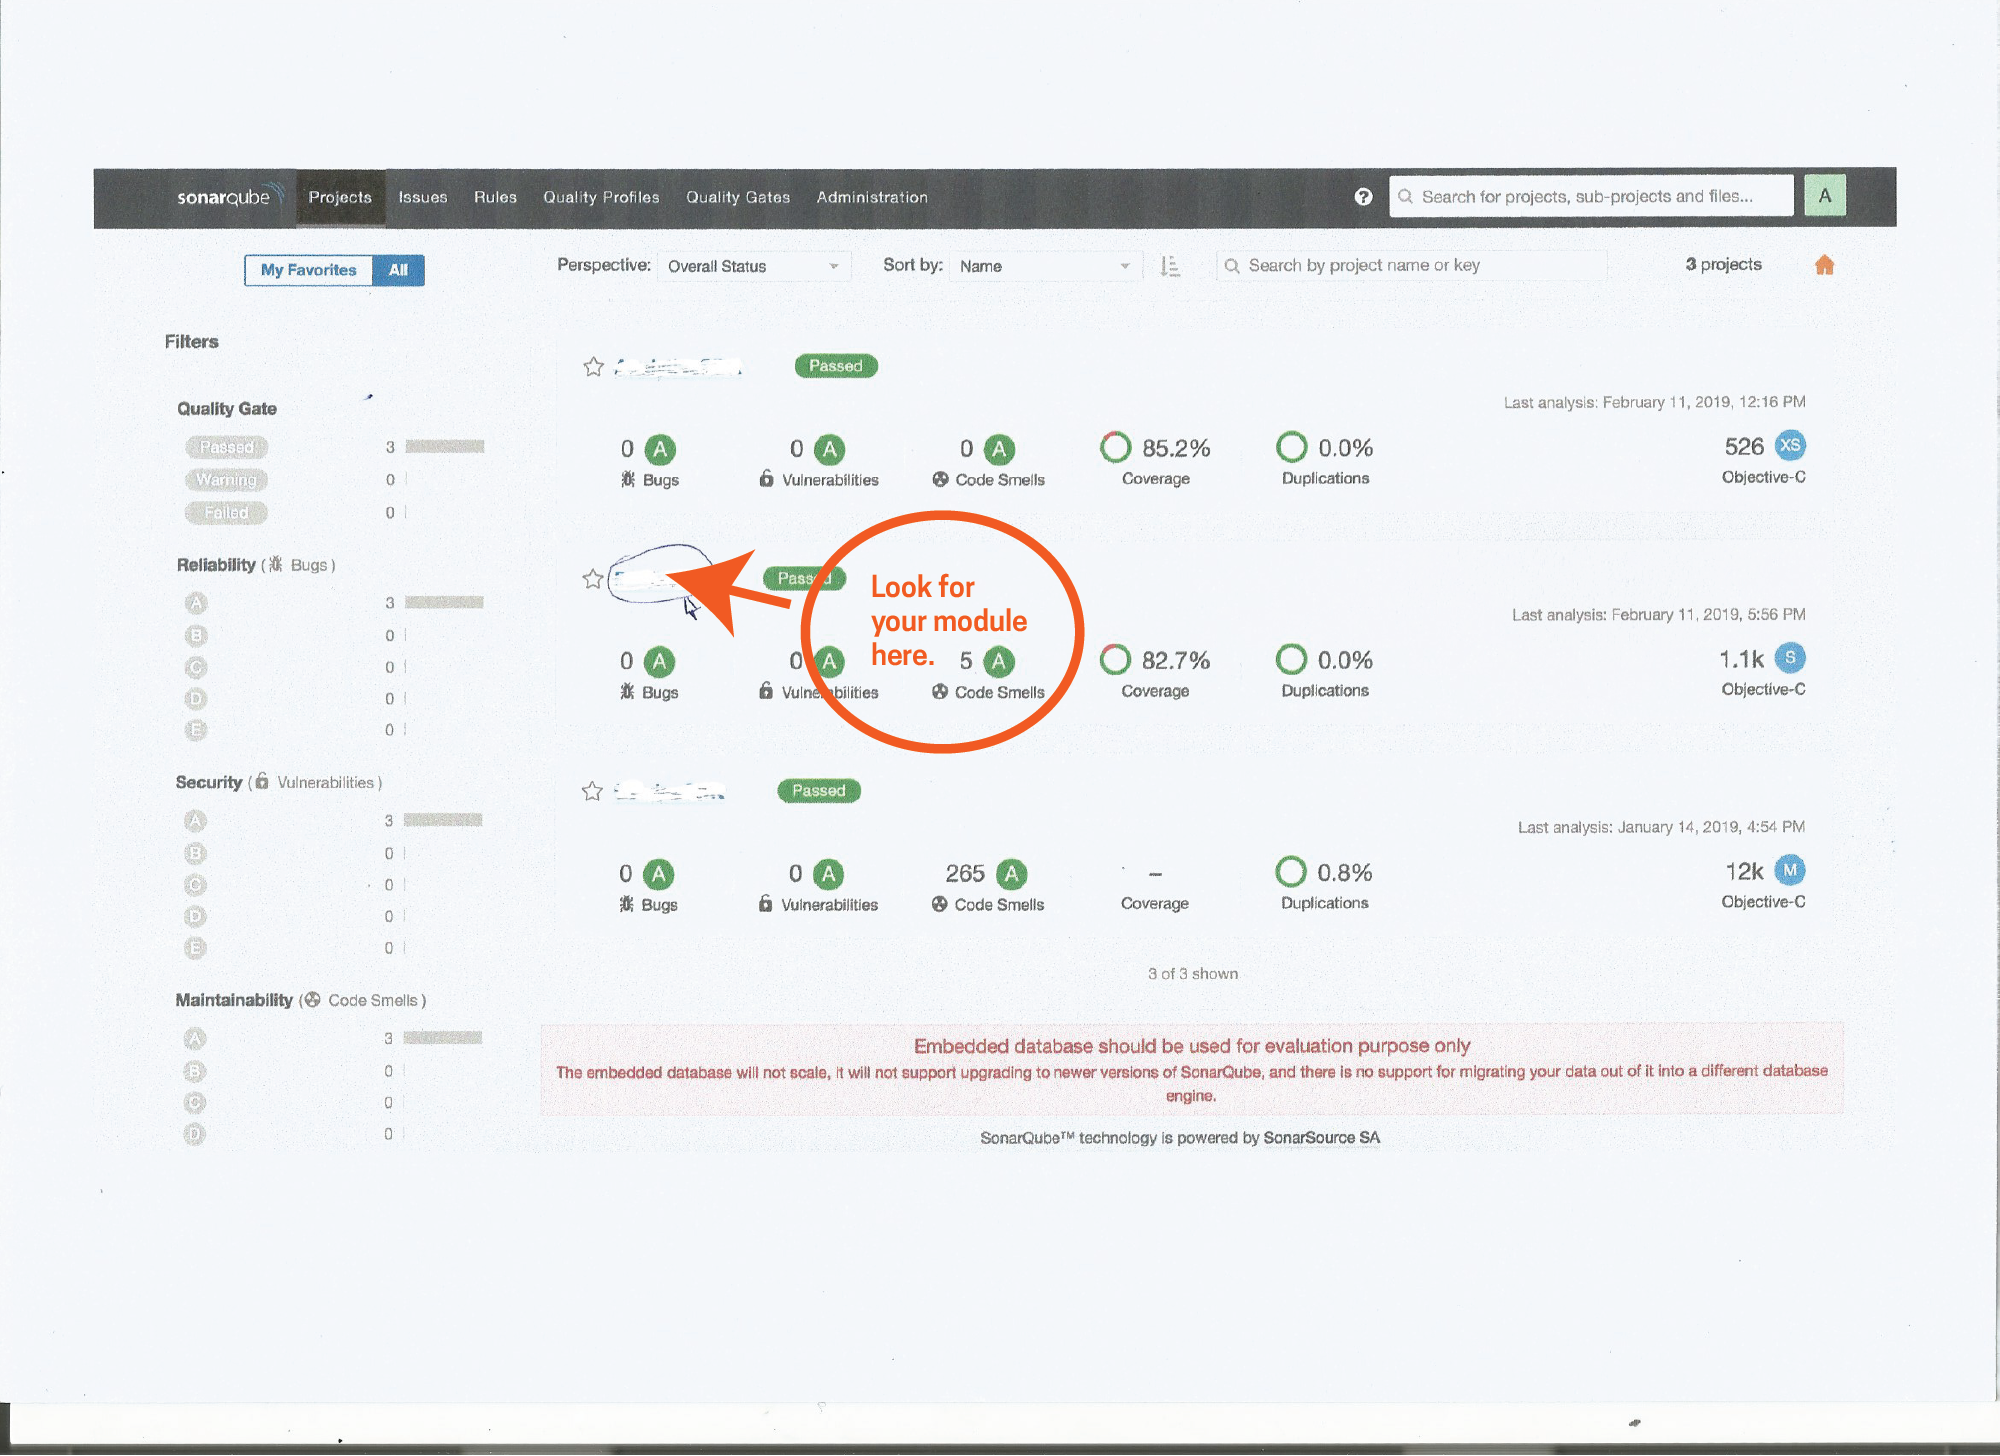
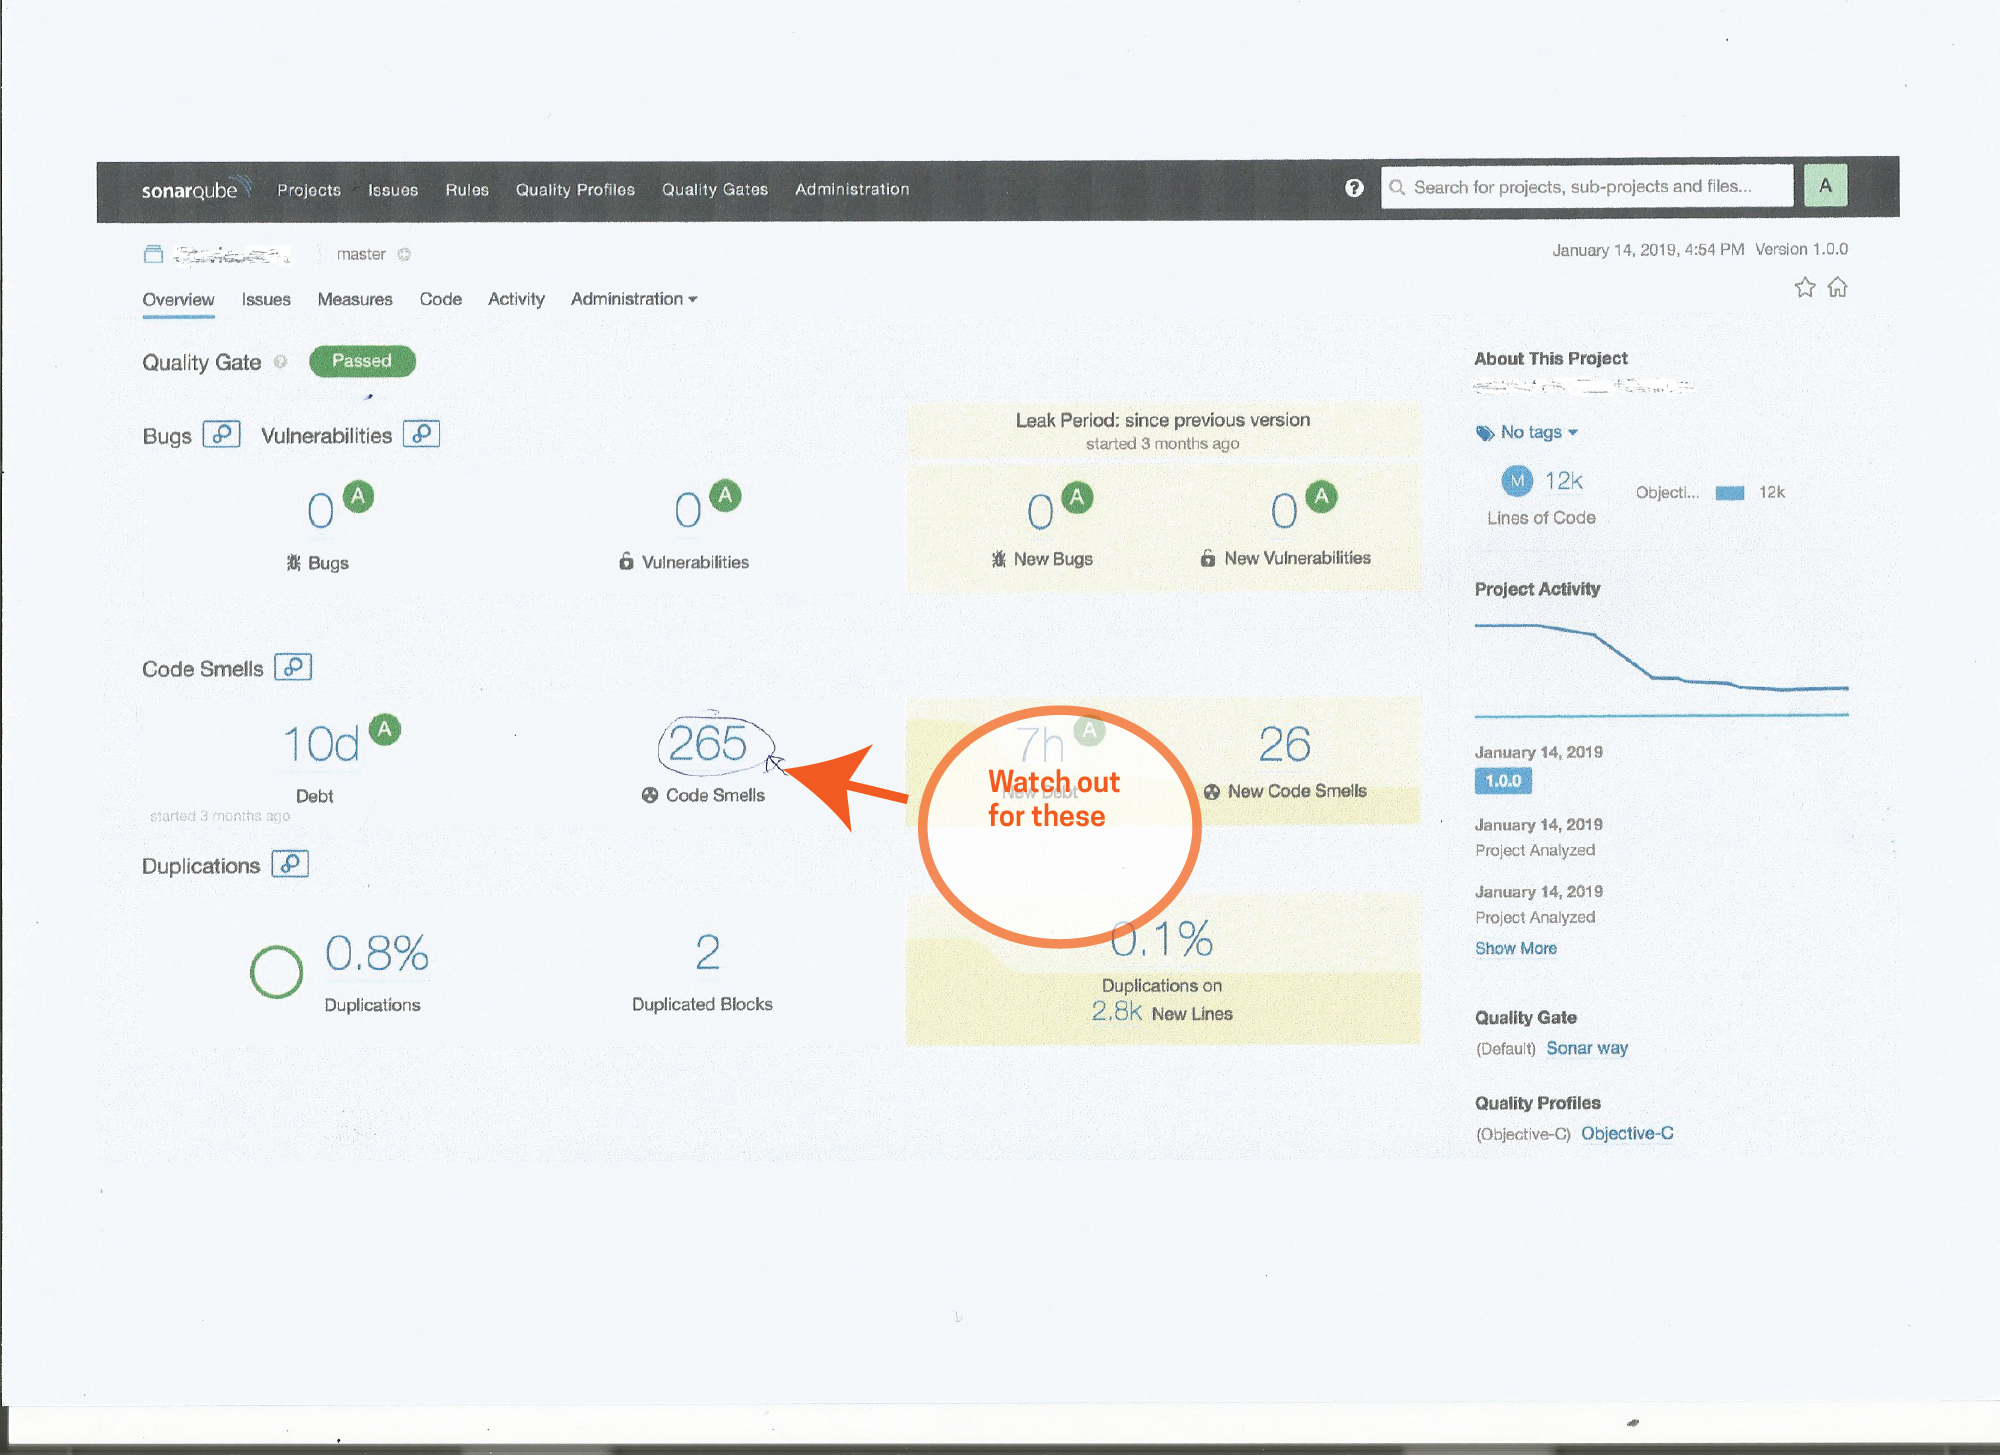
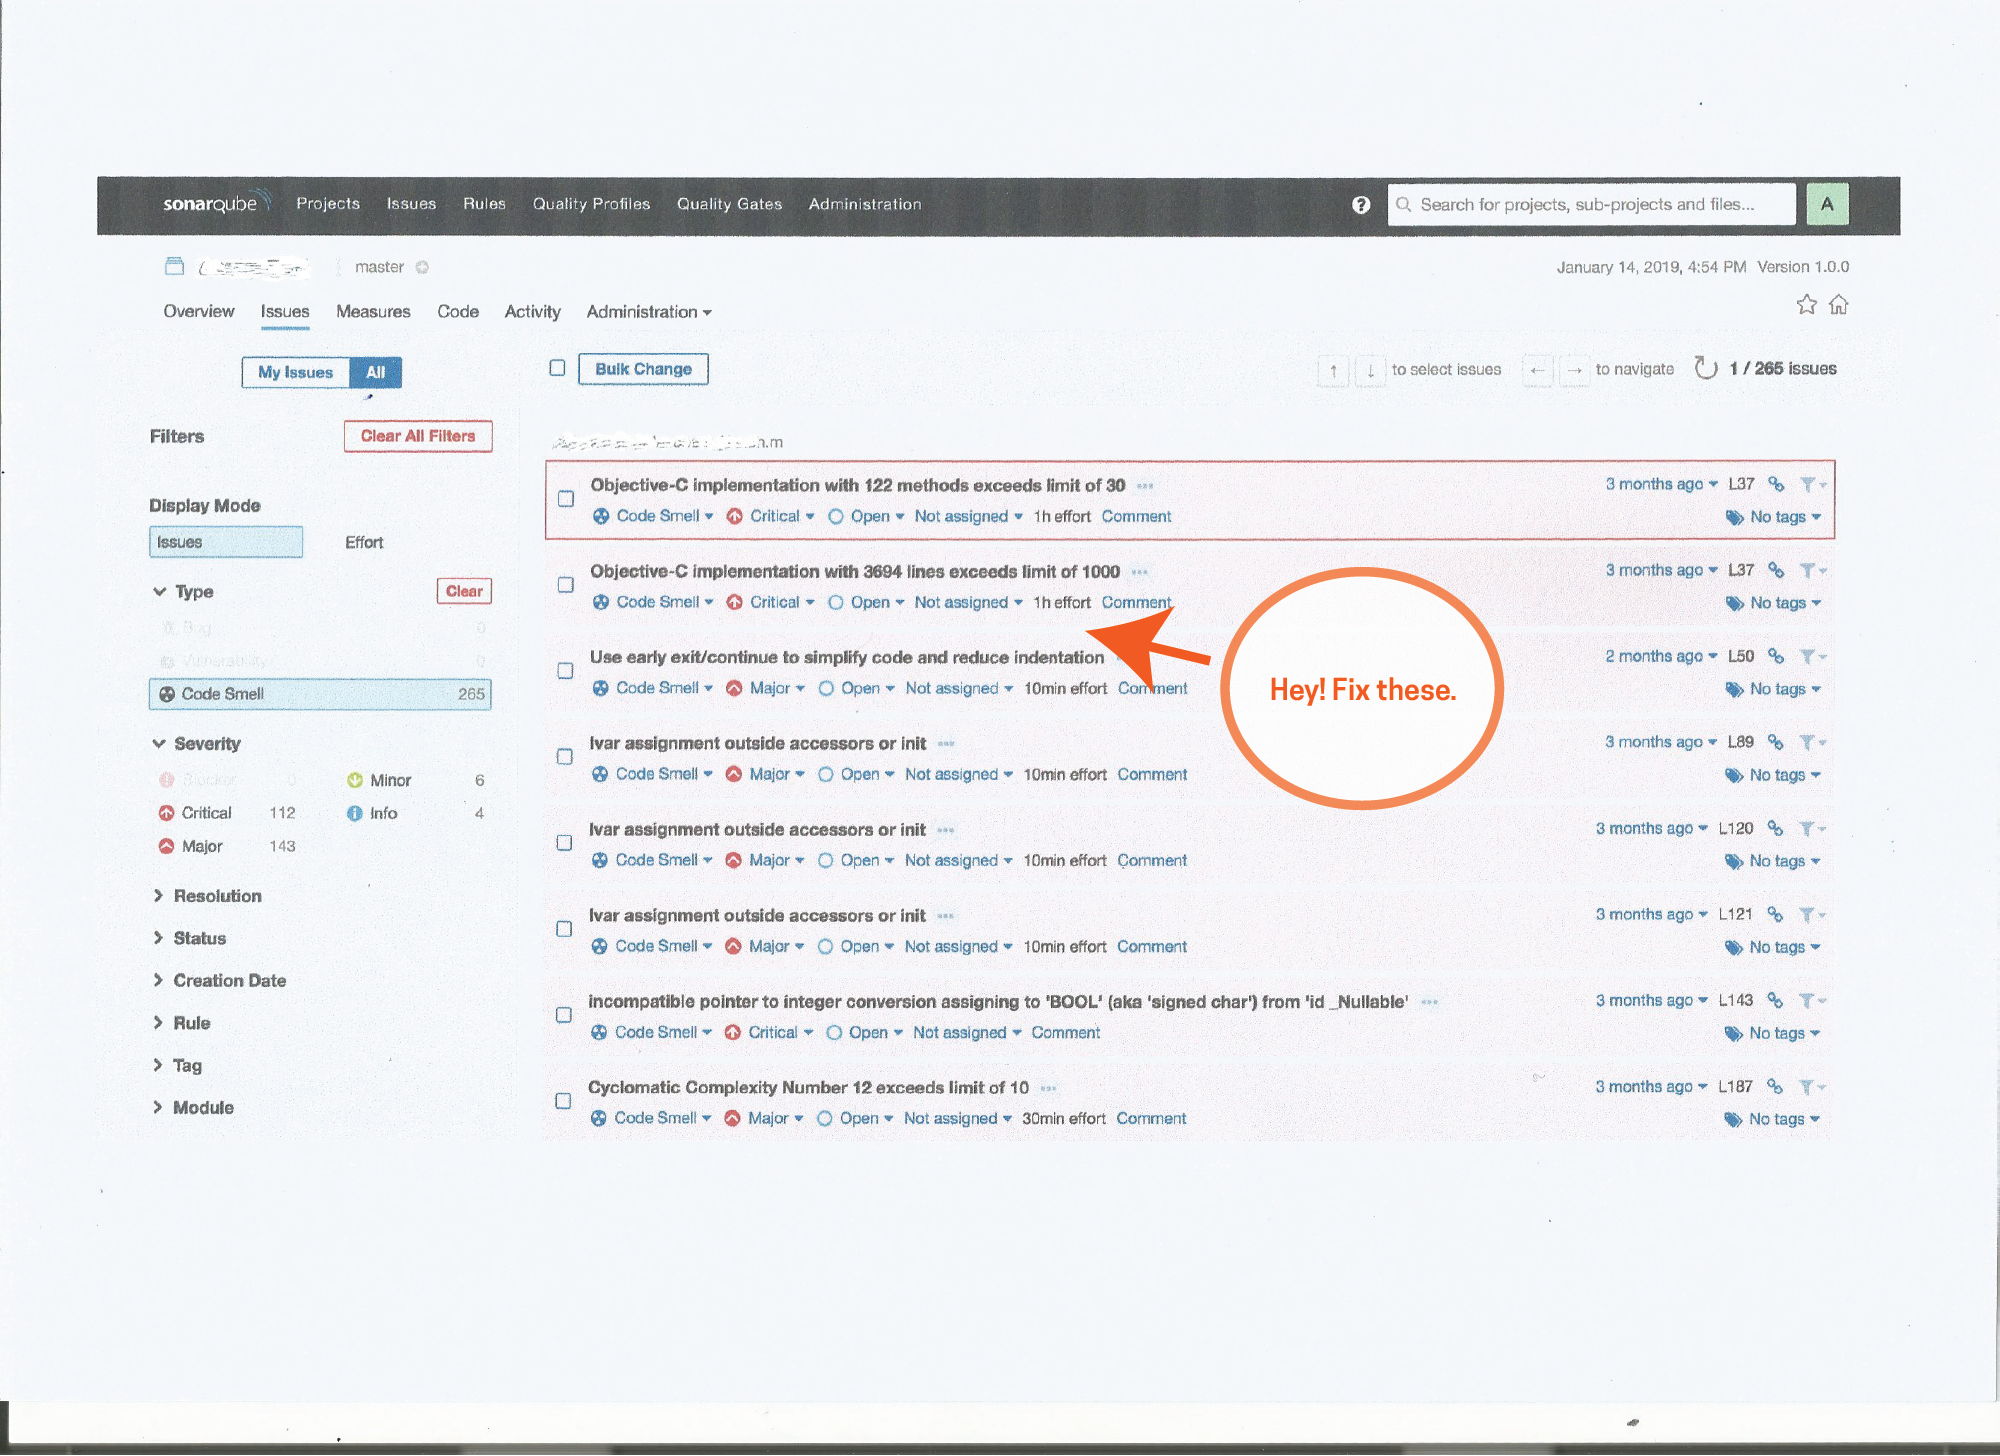
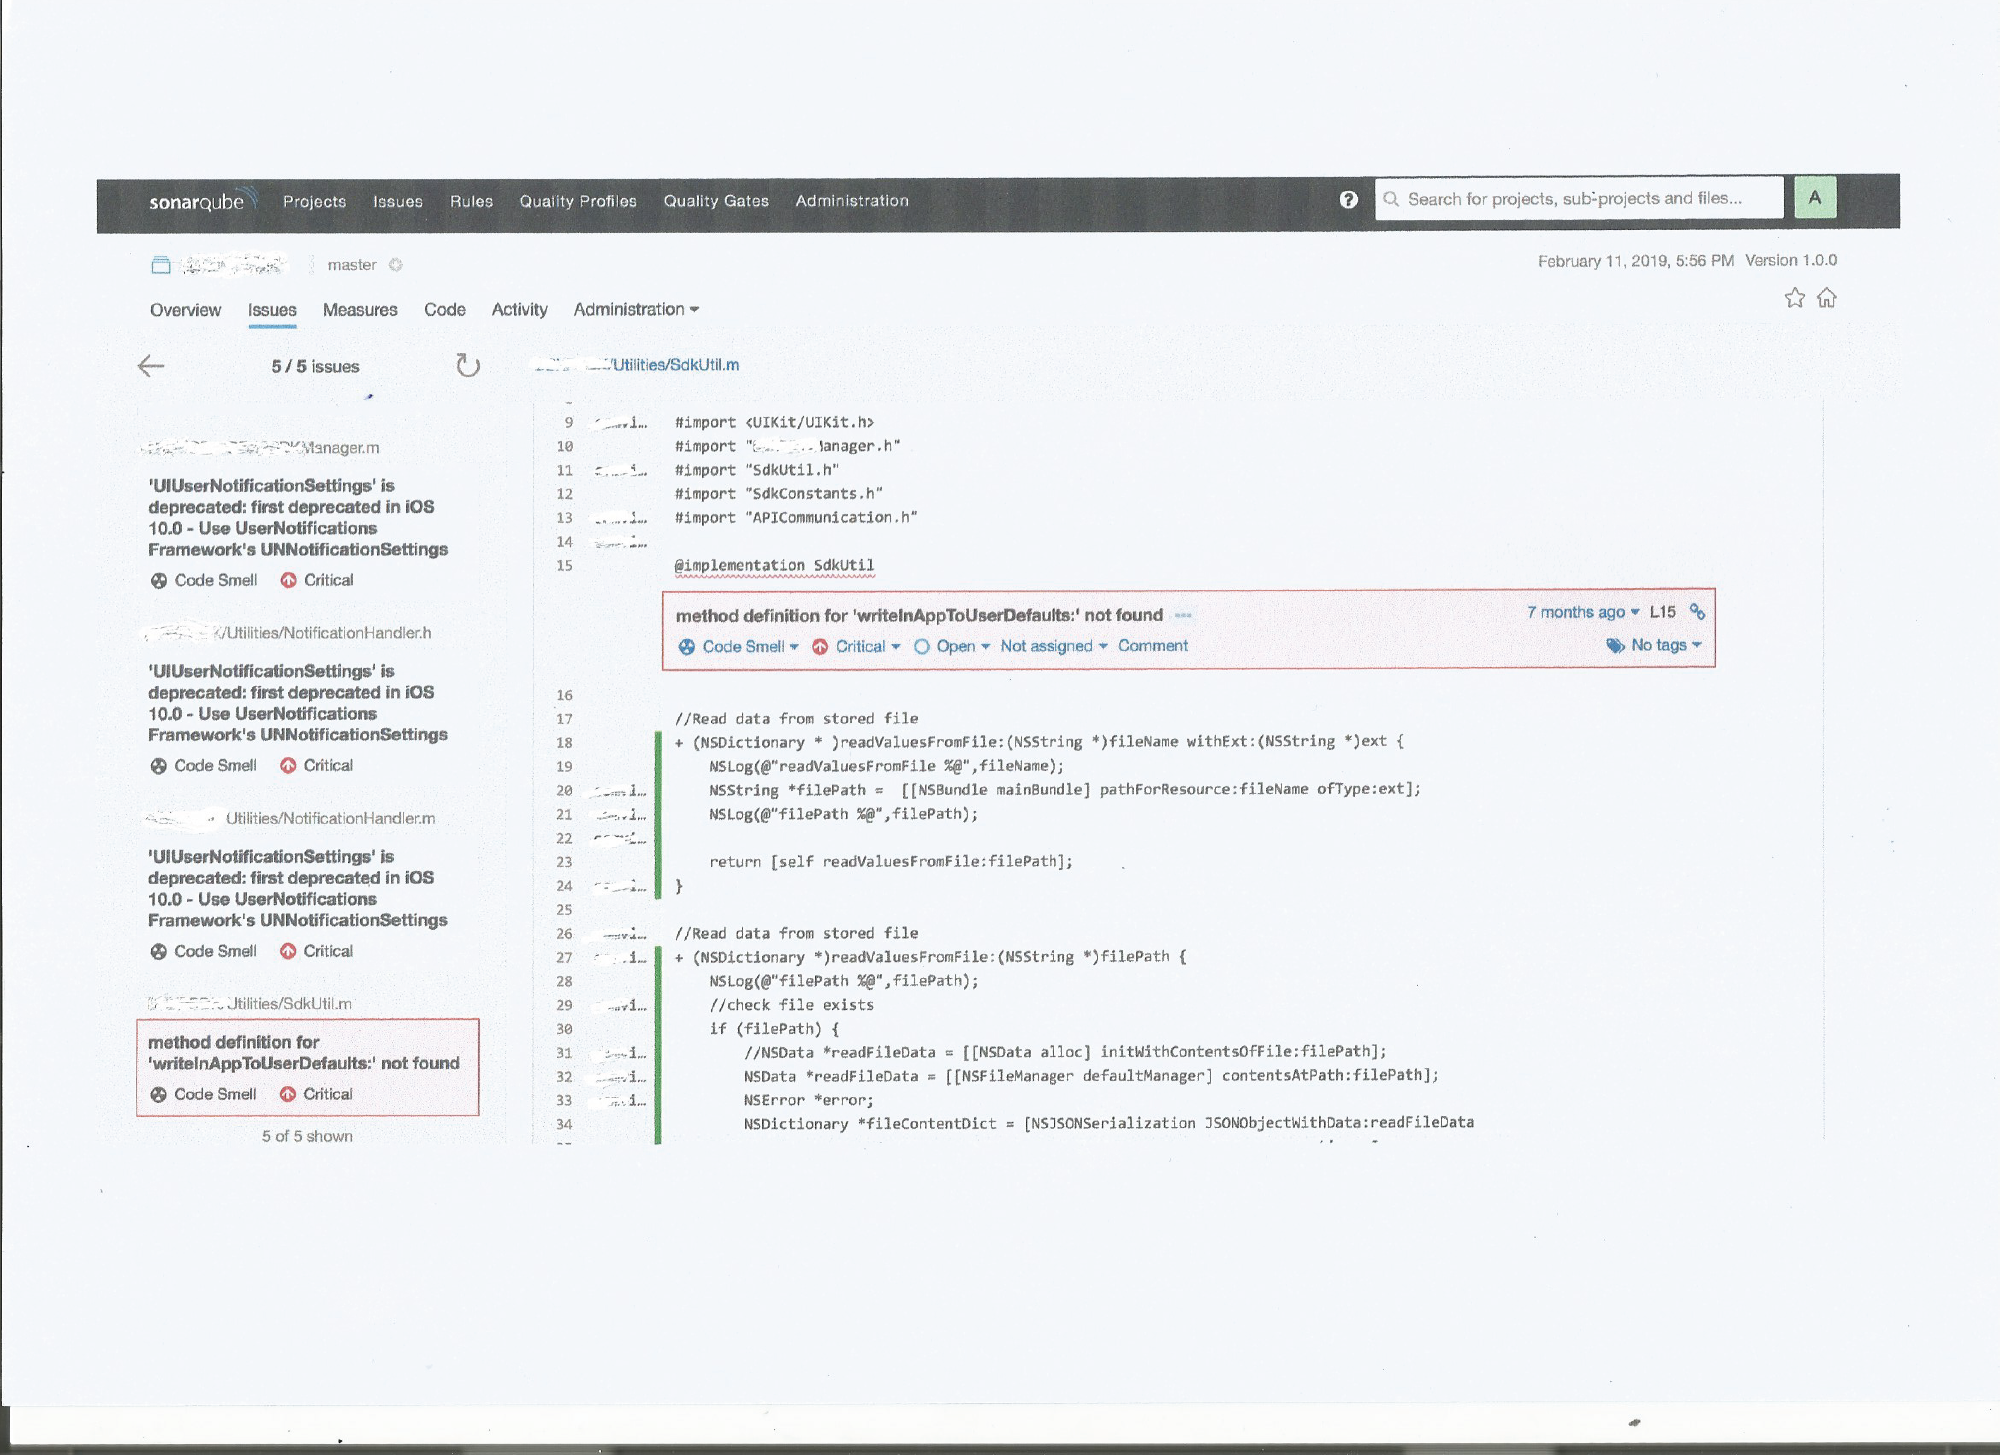
Fruits of your labor
Here are few screenshots of the code review. I just marked points where you get started.
Last words
I specially liked SonarQube because i develop both native Andorid and iOS app. I can use the same plug-in for both swift and Objective-C. Be careful while configuring. It is great tool to use. It will really help. I loved the way SonarQube prompts after every code block.